Wednesday, August 1, 2018

It's Beautiful.ai


The search is always on for a unique way for presenting information that is pleasing, visual and engages the senses of the learner.  While we all know that the best engagement comes through doing something, there are still those times in which we need to simply share information. So, if we do, shouldn't it be beautiful?  Last year I learned about Beautiful.ai when Diana Laufenberg, an amazing educator and consultant for my district at that time, used it in her presentation.  As Diana so easily does, she presented using it as a way of learning it and became an instant example of the type of learners we should all be.  As such, when I was called upon to present to a large group of unknown educators, I thought I would try it too!  Of course, Diana was right, the tool was awesome!  Easy to navigate, rich with features and aesthetically pleasing to those watching the presentation. 
Beautiful.ai encourages the presenter to rely more on images than, text, to use appealing color schemes and guidance along the way.  Included in the sample landing page is a deck that teaches you some basic design principles. In reference to building a quality presentation, Beautiful.ai reinforces Brevity, Balance and Consistency in creation. Automated adjustments to the design as you work are awesome and assist you in creating a better product.  Finally it is a collaborative tool allowing you and a team to work together to be beautiful.ai.


Thursday, October 20, 2016

Beautiful Messaging

I recently came across the tool Pablo by Buffer as a great way to create some really awesome communication graphics.  While intended to be used for social media, I have found it a great resource for creating creative graphic slides for the message boards in our libraries.  While the feature to add quotes easily from the bank of available quotes is awesome, I to find that the ability to add my own text is more valuable.  The images are awesome and the search-ability make the tool really efficient. I have not only use this for our display screens but they make some great slides when inserted in a Google Slide presentation as well.  Give it a try!


Friday, February 5, 2016

Five for Friday - Resources I Just Had to Share

This week while working on the resources for the monthly Digital Teacher Challenge in my district, I spent some time digging into Apps.  Our theme for February is Get Appy!  I concentrated on apps for all different tools as we have Chromebooks (Chrome Webstore and connected Apps), iPads (iOS Apps), and Android Tablets (Google Play Apps).  Through this research I came across so many great resources both app and web-based, I thought it was a shame not to share here as well!  So here's Five for Friday!


Read with Me - This great app helps teachers to assess fluency in students using custom options.  Some of the custom features available in the app are the ability to add your own miscues, name the miscues in a way that makes sense and the ability to count or not count the miscue in the score of the student.  Additionally the reports look to be quite complete.  They are integrated with Google Sign-in and Schoology.


FlipQuiz - This jeopardy style review game is a simple fee way to make review games with kids.  Find quizzes already built or create your own.  You can add answers to the game board if you choose so that you can be hands-free and host the game as you walk around the room.  Because all the answers are built in, you have the ability to send students a link to the game and they can play and review at home!  This is a free resource but with the PRO version you will  will get in-game score keeping, the ability to add your personal images, and many other features.

Hstry -This great resources allows you or your students to build a historical timeline rich with media (images, video and audio) in addition to the engagement features of commenting and quizzes or checks for understanding.  Timelines can then be shared and easily embedded on a website or blog using the embed code generated on the site.  With the free service you can have 200 student timelines.  Explore this amazing timeline from their site on Life in the Colonies.

ApplicationAlgebra Calculator  - This great resource is a calculator that gives a student step-by-step help on algebra problems.  Students can use this to enter a problem and instead of the calculator generating just the answer, it generates each of the steps to get to the final answer with a short explanation of what those steps entailed.

ApplicationPeriodic Table - Chemistry Tools  This is a free interactive app for exploring chemical elements and their dependencies in the periodic table.  The app allows students to see the elements in various ways and makes the periodic table interactive.  See the elements, details, atomic structure, boiling point and more.  Student s can sort by properties, classification or state.


Monday, January 4, 2016

Quizizz - Make Learning Fun!

There are a number of review tools available for teachers to use to add interest to studying information.  I hear the sounds of Kahoot, Socrative and Formative and I get encouraged by the excitement that is stirred in students through gamifying studying that I remember being boring a laborious.  Another resource that I came across on Twitter today adds to the growing number of resources that can be used to encourage the excitement.
Quizizz allows for multi-player practice encouraging collaboration.  It does require that students under the age of 13 have parent permission, but it also has a way for students to play without registration.  Similar to other resources, once a teacher initiates a quiz, a code is generated for the quiz in which students enter to play.  Students answer the questions at their own pace and once they complete the question set, the can review their answers while awaiting the rest of the class to finish.  Quizziz has many already created question sets of which you can try out.  Give it a try.  Here's a quick video walk through.


Additionally, Quizziz has added a feature for homework in which you can launch a quiz using the homework feature that will allow you to set a deadline for the homework.  The assignment displays live and the reports feature will tabulate during the window of which you set for the quiz.  They have recently added a feature to this that allows students to resume a homework game that they may have started before.  This would be a great test review in which students begin in class and then finish at home!

Quizizz keeps a blog with some great tips that is worth checking out.  I'd love to hear from anyone who give this resource a try!  Let me know how it goes!

Friday, October 23, 2015

Geo fun with Google Maps

I could spend all day exploring the great things to do with maps in the classroom.  Between Google Earth and My Maps, there are so many ways to explore the earth and connect it to content in the classroom.  As I prepare to teach a class on this for staff, I got lost in the many games that are now available for kids to just have fun with maps.  What is really great is that they work on a Chromebook making it something that kids can do on their own devices.

SmartyPins is a marriage of trivia and maps that is wrapped up in a fun game for kids.  You begin by selecting a category (arts and culture, science and geography, sports and games, entertainment or history and current events). You are given 1,000 miles  certain  number of miles of which you can lose for inaccurate answers or gain for fast answers.  Areas currently covered are the U.S., U.K., Australia and Canda.

Another equally fun but more interactive map exploring game for kids is called Geoguesser.  This web-based game can be played in single player or challenge mode.  You are dropped in a street view map and you have to guess where you are.  You can move around the location, spin the view to explore and use clues to explore.  You gain points while trying to guess 5 different locations.  Additional games for various continents and topics are also available.  Learn about the location while experiencing real street views!  So much fun!


Thursday, October 22, 2015

Dress up those Presentations!

A while back I learned about Slides Carnival as a resources for some great presentation templates to dress up Google Slides.  I used many of them and was pleased with how easy they were to copy and use.  Slides Carnival not only provides you with great templates but each template has some awesome presentation tips and guidelines for creating better presentations.  The second slide of the presentation generally give instructions for use as well as the attribution requirements for the graphics within the slide making it easy, clear and fun to build off of some great ideas.
This week I revisited Slides Carnival to see if there were new templates I might use and was pleasantly surprised to find that they have added several new ones.  And they are FREE!  Specifically the Halloween 2015 Slide Carnival Template Deck would make for a fun Halloween themed lesson full of pumpkins, cats, spooky font and more.  Check it out by clicking here.


From the last time I visited, only a few months back, there are 8-10 new templates for various topic and styled presentation.  They are so useful for their flowcharts, graphics and backgrounds.  Most of them include tables and maps but they all have a series of icons and clearly support a one color presentation styled focus.

Give Slides Carnival a peek to add some variety to your classroom lesson slides.  Communicate creatively!

Wednesday, October 21, 2015

Video on a Chromebook - No Problem!

More and more schools are equipping students with Chromebooks as another tool in the toolbox of the 21st Century educator.  Making use of the webcam is something that kids love to do but using it requires opening up app and resources that are not always the best for kids under the age of 13. While a resources like WeVideo is great, it has many steps and is not one I would consider to be a simple solution for a teacher that wants to do a simple one-take video.  So, I went searching, and I found it!


Clipchamp is a web-based service that is great for kids as  the videos that you make never leave your computer, there is no needed account to set up and it is free!  Students can record up to a 5 minute video using ClipChamp.  Once the video is recorded they can either download the video to their device or they can share it.  Sharing the video give them options to send the video to Vimeo, YouTube, Facebook or.... GOOGLE DRIVE!  Yea!  How perfect for schools using Chromebooks! ClipChamp is also available as a Google Chrome App in the Chrome Web Store here.


Simple directions for using ClipChamp are here:

Clipchamp is marketed as a video trans coder or converter so  you will notice that from the home page there are two options:

For classroom use and to simply record a video:

  1. Go to ClipChamp.com
  2. Click Record Video 
  3. Click to Allow the browser to access to webcam and microphone
  4. After the 3, 2, 1 countdown, record the video
  5. Once you are done, the screen will change to a green color and you will notice two buttons for "Share Video" and "Save to Computer"
  6. The "Save to Computer" will save the video 
  7. Hover over Share Video and option of:  YouTube, Facebook, Vimeo and Google Drive appear in the drop down menu
  8. When you allow ClipChamp to save to the Google Drive, you will be given options as shown when saving.  Complete the form and Publish!

From Google Drive the video can be shared with only certain people.  The integration with Google Drive is key here because it allows students the opportunity to create a simple video and share it with their peers or teacher.  Another great tool to help kids show what they know!


Wednesday, September 2, 2015

Simple Formative Assessment

I am always looking for an easy way to digitally complete formative assessment for teachers.  It seems like there are always so many different hoops to jump through to get to the actual assessment piece and so when my friend Tim Childers tweeted out about Formative, a great tool for collecting live formative results from students, I investigated.  (Actually, for most people who know Tim, we all listen when he Tweets, posts or otherwise makes his digital mark.  It is always good and you should all follow him here @tchilders.)

Formative assessment is loosely defined as assessment used to collect feedback that guide the lesson, and learning for the students.  Generally they are low stakes assessments that help personalize and support the flow of the instruction.  With that in mind, Formative is a tool for collecting information that helps the teacher better know what students need.

One unique feature of Formative is that it allows for personal responses in the form of written responses, drawings or even through the submission of an image.  With the ability for a student to submit an image or drawing it opens opportunity for creative unique responses that are otherwise hard to collect. A sample of the tutorial drawn responses is shown below.

With Formative teachers will be able to view live results of the students as they work in class.  Another great feature is the ability to share an assessment with other teachers.
Upon logging in as a teacher you are presented with the Formative dashboard and a tutorial and sample assessments to help you get going.  Formative also has this great Google Doc to walk you through their product.  Formative has a channel on YouTube full of various topics in which you can learn all you need to know.  They are very well done and brief enough to allow you to select only those that you need to get going.  The introductory video is here and should give you a great overview.

Formative's claim is that the tool works on any platform.  I have not tried it on all devices but I would guess that some forms of entry, such as drawing a response, would be easier on a tablet device than a Chromebook or computer.  Additionally, it is important to know that Formative's Privacy Policy requests that if a child in under the age of 13 that consent is obtained by a parent or guardian.

I am really excited to see how Formative can be used in various classrooms.  Please share or comment if you are or have used it!

Tuesday, September 1, 2015

PowToon That!

PowToon announced today that they are giving away $10 Million of classroom accounts for the school year!  How cool is that?  Wondering what PowToon is and why you might want to sign up?  Read on....

PowToon allows you to create great animated lesson plans and presentations that are fun and engaging.  All the animation tools are right there in the dashboard to get you started in creating great videos.  The dashboard will guide you through the process of creating the videos.  Once you finish you can download the video to keep forever or push the video to YouTube.  PowToon is a great alternative to PowerPoint or traditional slides.  Give it a try!


With this great FREE gift from PowToon you will get:

  • The Complete Slides pro package
  • 24/7 premium support
  • HD video for teachers
  • Up to 60 students having access for free
  • up to 15 minute videos + presentations
  • Royalty free styles, tunes + images

As I know it always comes up, the statement below indicates that they are COPPA compliant.
Children’s Online Privacy Protection Act Compliance
We are in complete compliance with the requirements of COPPA (Children’s Online Privacy Protection Act). We do not collect any information from anyone under 13 years of age. Our website, products, and services are all directed to people who are at least 13 years or older.

Wednesday, August 26, 2015

So Many Ways to Show What You Know

This summer it seems there have been some really great resources made available to educators across multiple platforms.  Capturing the learning and understanding of students is and important goal for educators. but being able to capture it digitally and authentically using multiple forms of digital media on devices that are native to the students work flow is the icing on the cake.  Today I read about SeeSaw becoming available on the Chromebooks, iOS and Android on one of my favorite blogs Education Technology and Mobile Learning.  A few weeks ago Explain Everything announced that their app is available free for Chromebook users.  These are the kinds of resources that make learning exciting for the student and the assessment and portfolio process easy.  Consider checking in on both of these tools as described below to show what you know either as the educator or learner in your classroom!


 Explain Everything is easy to use, but here's a great tutorial to get you started!


SeeSaw, also easy to use, has a great tutorial here and they have a great channel of tutorial videos to sift through.


Wednesday, July 8, 2015

Focused Presentations

In an effort to focus as well as digitize the learning experience for students there are a number of resources out there to explore.  Many of them with similar features. Working with teachers it becomes challenging to know just what would be the preferred resource for each classroom.  So, I thought I would  showcase them all in one location.


PearDeck is an inquiry-based learning tool.  A teacher creates a presentation and shares it with the students through a code.  The teacher sees which students have joined the session.  As the teacher advances, the displayed teacher screen requests students to respond in a variety of ways.  The teacher can lock in student answers so they can no longer change them and display all student answers joined on one screen.  These responses can be in text form, by sliding a marker on a map, giving a thumbs up, drawing or other standard responses.  Tools such as dragging a marker on the screen, drawing and Google Slide importing are a part of the paid features.  For free teachers can have up to 30 participants, use text slides, multiple choice, number slides and unlimited PearDecks.  PearDeck is available in the Chrome WebStore.

Thursday, June 4, 2015

Creativity Using Drawings in Google Docs

Chromebooks have a lot of great abilities that are often underused.  One such ability is the webcam. In many schools where we turn off the student's access to Google Hangouts, the students are left with few uses for the webcam.  However, the webcam can be a powerful tool not only to take video, but also to take images and add creativity to student work.  When we can make use of a student's images, videos, hand drawings and authentic work, we add credibility to their work that adds to a feeling of ownership of their work. In an effort to capture some of these ideas, I created a list ideas.  To be clear the goal is not the use of the technology, but the gain that the student has in ownership, creativity and personalizing their work. Here are just a few ideas that I just know will make the difference for some of your talented students!


May 21, 2015 8:17:55 AM.jpg
  • Artwork Portfolios - Before sending artwork home to students, have them snap a photo of the work and blog about it.  They can explain the process, what they learned and capture their thoughts on the project.  Then, share these reflections with the parents.  From a  parent's perspective, I find I get the artwork home with my kids but rarely have an appreciation for the work involved or learning that my children gained through the project.  Additionally there is a great record of the project.


    May 21, 2015 8:18:40 AM.jpg
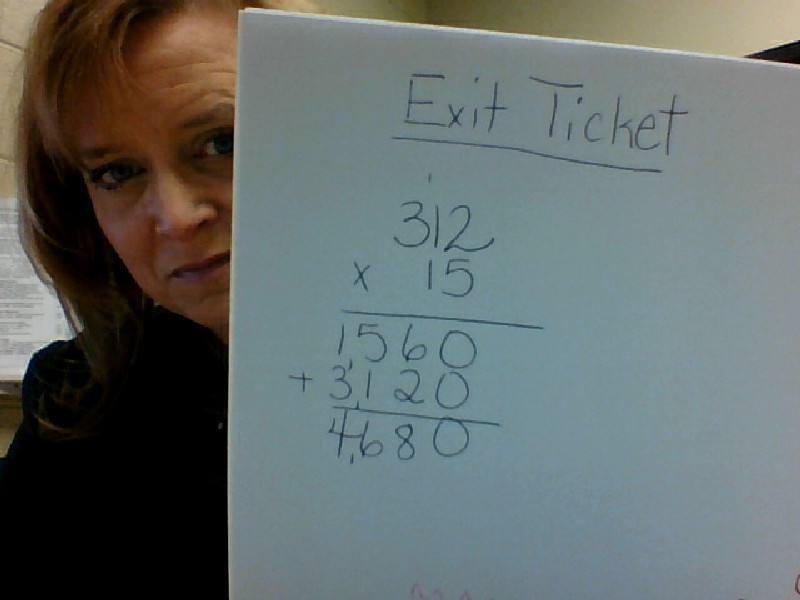
  • Show Your Work! - Have students share their work in math often hard to capture or create digitally.  What I love about this is the ownership that students have as it is still in their own handwriting.  Students can then draft the steps to solving the problem in text along with the image shown. In my sample I peeked around the page as I took the picture but how cute would it be to have a student's 


  • Snap a Team Selfie -  Have a group of students snap a team selfie to show who worked on a project and then display this as an opening slide for a presentation.  Give a little ownership!

  • Capture the Process - We often say that the journey is more important than the destination but we only celebrate the final product with students.  So much of the learning happens as students move along a learning process.  Capture the steps to the process, the struggles, successes and landmarks through photos.

  • Create Photo Assessments - Have students submit a photo and summary of their work and learning as an assessment and record of their learning.
It seems like this small list just scratches the surface of the many creative ways you could use images and the Chromebook's camera.  What ways do you use it?


Friday, March 13, 2015

Take a Tour or Create your Own!

Google Tour Builder Header

Google Earth Tour Builder, while not a new tool is one that came to mind after sharing yesterday's post about the resource myHistro.  Both tools are similar and make use of maps and visuals.  Google Tour Builder combines Google Earth and a slideshow in which you can incorporate images, videos and text to connect locations all across the globe to tell a story.  While the first thought that comes to mind might be history, there are plenty other ideas for use including biographies, tours of locations, field trip summaries and literature studies.
Google Tour Builder is a tool that requires a computer (not a Chromebook or iPad).  On the computer it does require the Google Earth Plugin.

Creating a Tour is not challenging!  Check it out!

1.  Begin at www.tourbuilder.withgoogle.com.  Sign in to your Google Account and  click "Create New Tour".
2.  Complete the "let's get started" page.save image
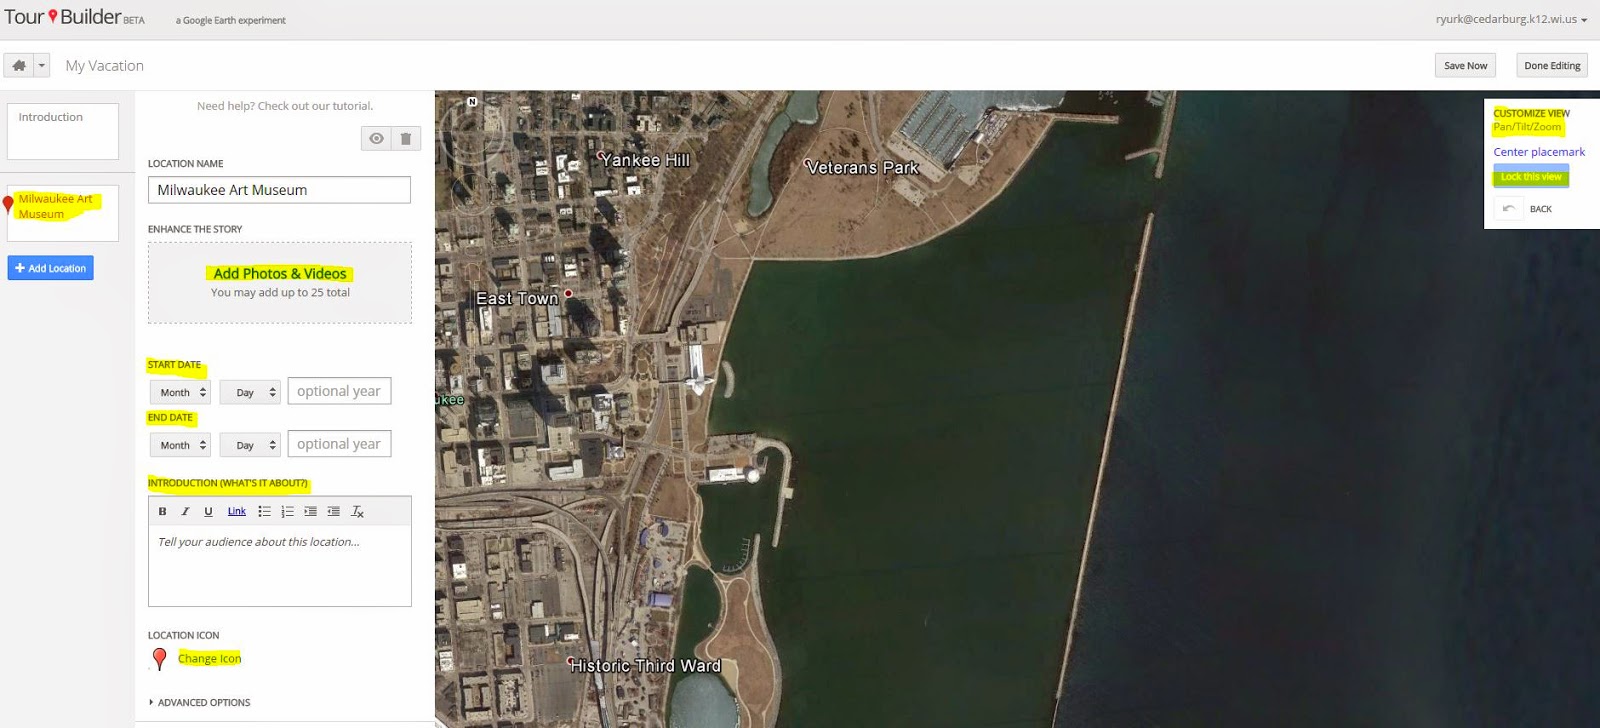
3.  The Next page is where you begin to introduce you Tour.  Complete the highlighted items and use the available tools to manage the view.
4.  Click add a location on the left side panel
5.  Type your location into the search or drop a placemark in a location you see on the map.  Click "add to tour".
6.  Once you Add to tour you then open a window in which you can personalize this location.  You can add up to 25 photos and videos, dates, a story about the location, and even change the icon that represents the location on the map.  One area not to neglect is the Pan/Tilt/and Zoom of the view in which the location on the map is viewed.  Once you have it set, don't forget to "lock the view".
7.  Continue to add your locations and they will build on the tour timeline on the left.  Once you are done, click "Save Now".  
8.  Then, just as you would share another Google Doc, you will see a "share" button in the top right hand corner.  Click on the share button and change the visibility to your desired settings.  Click "done" and you have created your first tour! 

If this step-by-step does not help you out, give this tutorial a try!


Thursday, March 12, 2015

Visual Timelines with Discussions


The ability for students to create and explore is a large part of the benefit to technology use in the classroom.  Teaching history is one of the areas in the curriculum where we often tell kids about events when we could be showing, exploring and interacting with the events that have taken place over time.  The resource MyHistro allows students to collaborate over a digital timeline that includes maps, graphics, discussions, and written information. This resource is one that a teacher could create and share or better yet, turn the creation over to the students to explore a historical period and create the timeline on their own.  As indicated in the video below, there is a built in element for a quiz within the tool, but the comment feature might provide deeper learning overall.  The free resources not only include a tutorial on the main page to learn from, but the following video summarizes the tool in a brief yet concise way.


Wednesday, March 11, 2015

Targeting Gramar Instruction with No Red Ink

I recently had the pleasure of attending my high school aged daughter's parent teacher conferences.  She's a really good student and so I always enjoy going as I know it will be positive and fun educational conversations.  This term was not really much different although I got to hear her Honors English 10 teacher rave about a website she has discovered.  I sat back and took in her excitement, recognizing that moment when a teacher is "on fire" with a new tool for their classroom toolbox.  She excitedly told me about No Red Ink.  I decided to check it out and this is what I learned:


This website is built to help kids learn to be better writers through the use of grammar instruction.  The site polls students about their interests, favorite books, movies, peers, etc. and then uses those results to build grammar questions about those things in which they are interested.  The work kids do is adaptive and keeps records for teachers all while scoring the work for them.  The site is free for parents, students and teachers.  There is unlimited practice so that the class time is not taken up with grammar practice.  A great introductory video is included below.  Winder if this might fit in your classroom?  Me too?