Thursday, June 4, 2015

Creativity Using Drawings in Google Docs

Chromebooks have a lot of great abilities that are often underused.  One such ability is the webcam. In many schools where we turn off the student's access to Google Hangouts, the students are left with few uses for the webcam.  However, the webcam can be a powerful tool not only to take video, but also to take images and add creativity to student work.  When we can make use of a student's images, videos, hand drawings and authentic work, we add credibility to their work that adds to a feeling of ownership of their work. In an effort to capture some of these ideas, I created a list ideas.  To be clear the goal is not the use of the technology, but the gain that the student has in ownership, creativity and personalizing their work. Here are just a few ideas that I just know will make the difference for some of your talented students!


May 21, 2015 8:17:55 AM.jpg
  • Artwork Portfolios - Before sending artwork home to students, have them snap a photo of the work and blog about it.  They can explain the process, what they learned and capture their thoughts on the project.  Then, share these reflections with the parents.  From a  parent's perspective, I find I get the artwork home with my kids but rarely have an appreciation for the work involved or learning that my children gained through the project.  Additionally there is a great record of the project.


    May 21, 2015 8:18:40 AM.jpg
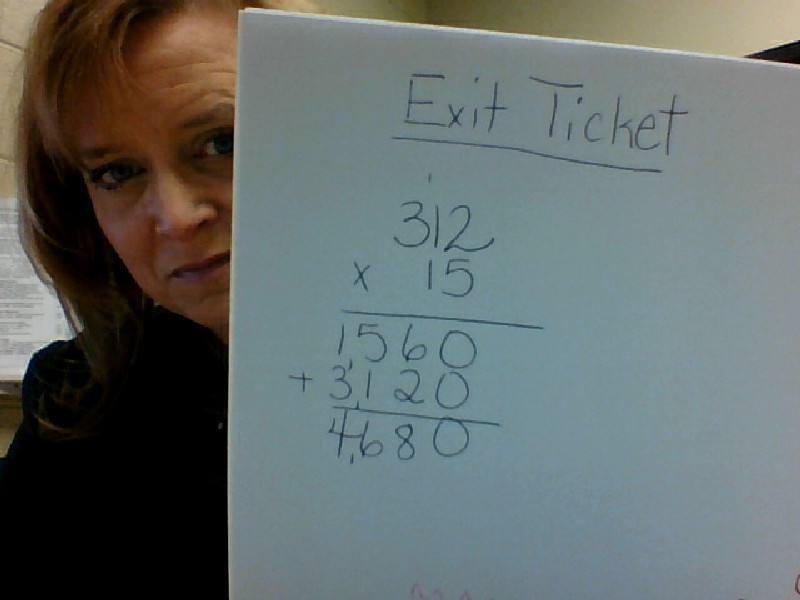
  • Show Your Work! - Have students share their work in math often hard to capture or create digitally.  What I love about this is the ownership that students have as it is still in their own handwriting.  Students can then draft the steps to solving the problem in text along with the image shown. In my sample I peeked around the page as I took the picture but how cute would it be to have a student's 

  • Snap a Team Selfie -  Have a group of students snap a team selfie to show who worked on a project and then display this as an opening slide for a presentation.  Give a little ownership!

  • Capture the Process - We often say that the journey is more important than the destination but we only celebrate the final product with students.  So much of the learning happens as students move along a learning process.  Capture the steps to the process, the struggles, successes and landmarks through photos.

  • Create Photo Assessments - Have students submit a photo and summary of their work and learning as an assessment and record of their learning.
It seems like this small list just scratches the surface of the many creative ways you could use images and the Chromebook's camera.  What ways do you use it?


Friday, March 13, 2015

Take a Tour or Create your Own!

Google Tour Builder Header

Google Earth Tour Builder, while not a new tool is one that came to mind after sharing yesterday's post about the resource myHistro.  Both tools are similar and make use of maps and visuals.  Google Tour Builder combines Google Earth and a slideshow in which you can incorporate images, videos and text to connect locations all across the globe to tell a story.  While the first thought that comes to mind might be history, there are plenty other ideas for use including biographies, tours of locations, field trip summaries and literature studies.
Google Tour Builder is a tool that requires a computer (not a Chromebook or iPad).  On the computer it does require the Google Earth Plugin.

Creating a Tour is not challenging!  Check it out!

1.  Begin at www.tourbuilder.withgoogle.com.  Sign in to your Google Account and  click "Create New Tour".
2.  Complete the "let's get started" page.save image
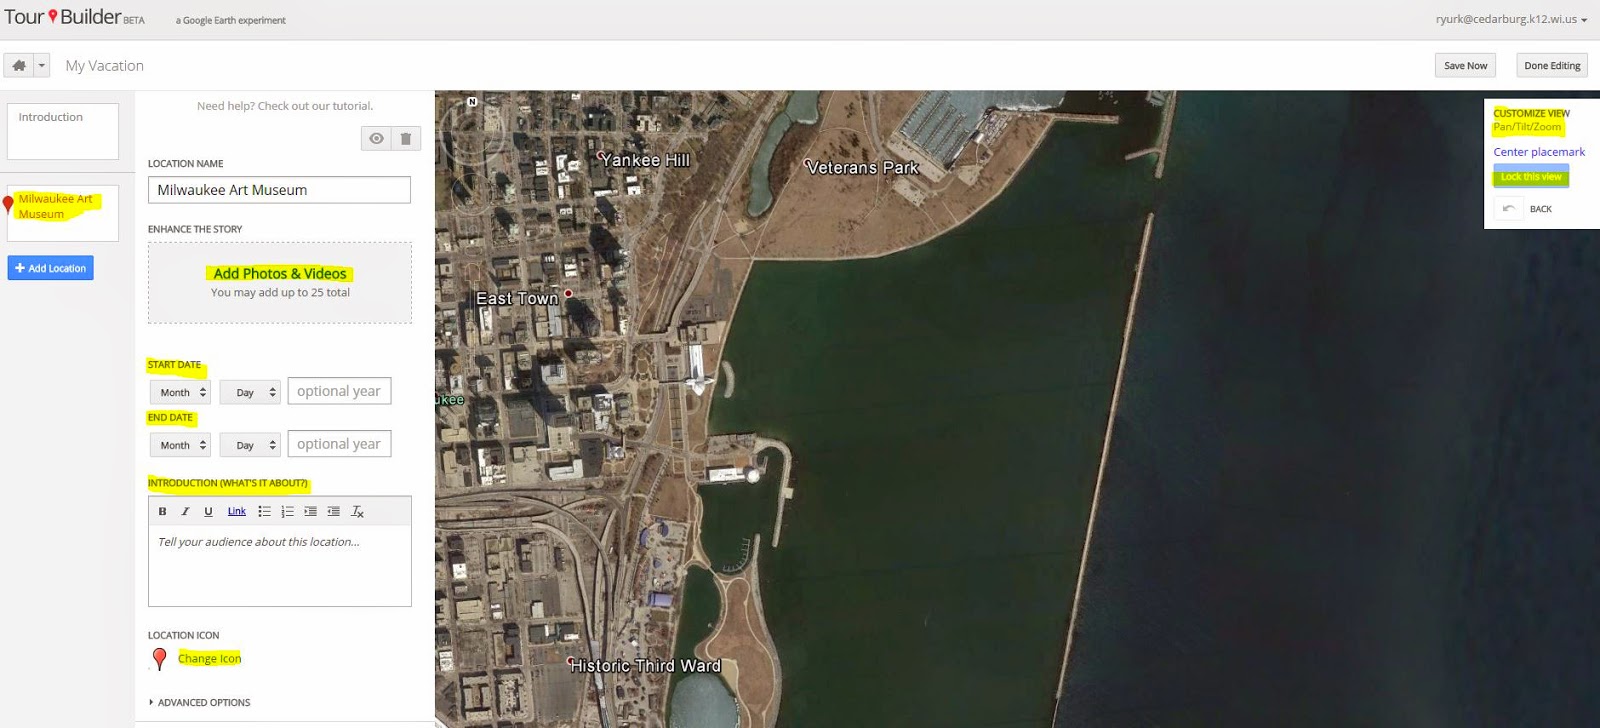
3.  The Next page is where you begin to introduce you Tour.  Complete the highlighted items and use the available tools to manage the view.
4.  Click add a location on the left side panel
5.  Type your location into the search or drop a placemark in a location you see on the map.  Click "add to tour".
6.  Once you Add to tour you then open a window in which you can personalize this location.  You can add up to 25 photos and videos, dates, a story about the location, and even change the icon that represents the location on the map.  One area not to neglect is the Pan/Tilt/and Zoom of the view in which the location on the map is viewed.  Once you have it set, don't forget to "lock the view".
7.  Continue to add your locations and they will build on the tour timeline on the left.  Once you are done, click "Save Now".  
8.  Then, just as you would share another Google Doc, you will see a "share" button in the top right hand corner.  Click on the share button and change the visibility to your desired settings.  Click "done" and you have created your first tour! 

If this step-by-step does not help you out, give this tutorial a try!


Thursday, March 12, 2015

Visual Timelines with Discussions


The ability for students to create and explore is a large part of the benefit to technology use in the classroom.  Teaching history is one of the areas in the curriculum where we often tell kids about events when we could be showing, exploring and interacting with the events that have taken place over time.  The resource MyHistro allows students to collaborate over a digital timeline that includes maps, graphics, discussions, and written information. This resource is one that a teacher could create and share or better yet, turn the creation over to the students to explore a historical period and create the timeline on their own.  As indicated in the video below, there is a built in element for a quiz within the tool, but the comment feature might provide deeper learning overall.  The free resources not only include a tutorial on the main page to learn from, but the following video summarizes the tool in a brief yet concise way.


Wednesday, March 11, 2015

Targeting Gramar Instruction with No Red Ink

I recently had the pleasure of attending my high school aged daughter's parent teacher conferences.  She's a really good student and so I always enjoy going as I know it will be positive and fun educational conversations.  This term was not really much different although I got to hear her Honors English 10 teacher rave about a website she has discovered.  I sat back and took in her excitement, recognizing that moment when a teacher is "on fire" with a new tool for their classroom toolbox.  She excitedly told me about No Red Ink.  I decided to check it out and this is what I learned:


This website is built to help kids learn to be better writers through the use of grammar instruction.  The site polls students about their interests, favorite books, movies, peers, etc. and then uses those results to build grammar questions about those things in which they are interested.  The work kids do is adaptive and keeps records for teachers all while scoring the work for them.  The site is free for parents, students and teachers.  There is unlimited practice so that the class time is not taken up with grammar practice.  A great introductory video is included below.  Winder if this might fit in your classroom?  Me too?


Saturday, February 28, 2015

Fluency Supported.....Digitally

Oral reading fluency can be so difficult to assess naturally with students as well as time consuming.  As an educator collecting running records from students I have often wondered about the students who get nervous reading aloud to me and how that affects their performance.  Then I heard about Fluency Tutor by Texthelp, and I can't wait to see it in action.

Fluency Tutor is an online tool, available in the Chrome Webstore as an app for both students and teachers, that supports oral reading fluency and comprehension.  The software incorporates Lexile-leveled passages for students in elementary and secondary levels.  Students are able to work independently to practice reading, record and submit assessments and monitor their progress.  Educators can assign specific passages to practice or assess, collect and listen to the students' submitted work and then mark or score them when time allows.  Teachers can set targets for students including Correct Words Per Minute and Lexile levels.  Parents have the ability to listen to the information the students have recorded as well.
After learning more about this resource, I wondered about that shy or those that get anxious about reading in the corner or hall to their teacher of reading specialist.  This resource seems like it would break down this barrier for many students.  I am excited to explore this software with students!


A great tutorial is included below:


Wednesday, February 18, 2015

Ever felt like it was "Too Long Didn't Read (TLDR)"?

Sometimes we all need a little help.  Time is short and we need to get to the point.  Sometimes you just want to get the general gist of something before you invest too much time in a resource or topic. That is what TDLR can do for you!  This week, Todd Bugnacki (actually his daughter shared it with him first), shared TLDR and it intrigued me.  I looked into it and this is what it is all about:

This is an extension for Google Chrome.  An extension is a feature or functionality that can be added to your browser (Chrome) that will allow it to do something it does not normally do.  TLDR or Too Long Didn't Read is free in the Chrome Webstore here when used on a webpage, will create a summary of any web article that your browser is displaying all while staying on that page.  The extension will appear as an icon to the right of the address bar in your Chrome browser once you add it.  The user has the ability to choose how condensed the summary is of the page.  Choices span from a summary, short, medium or long version of the page.  These versions map the length of the article from 25%, 50%, and 75% of the original article length.  Information from the reviews also indicates that it supports German, French and Spanish as well..  
Summary in Medium 
The use of this tool for personal reasons seems endless as we seem to take in so much more of our information from the web.  News, media, etc. can be time consuming to take in and a shortened version might be a real time saver.  I am curious how you might make use of this resource in the classroom or if it might hinder learning.  Feel free to comment regarding this below.  

A brief tutorial for the use of the extension from the makers of the extension is below.  

Monday, February 16, 2015

Putting the Pieces of a Digital Story Together

Last week I began working with a great group of K-2 teachers to explore digital Storytelling.  We used the presentation and link below to explore the parts of a digital story.  Each of the participants will be building a digital story next time we meet. As the K-2 teachers are using iPads we are focusing mostly on the use of iPad apps although some to the resources are also accessible on the web or through Google Apps.  Just sharing the presentation I used as well as the site that was created to support the learning.